Learning Node.js - React Native
Concept #
Android native: Cotlin/Java
iOS native: OC, Swift
RN is a wrapper of React (node.js) for Android/iOS.
Main ref: React Native Crash Course. 17 hours (34 tomatoes).
video on YouTube (3.5h video ~ 10h to learn),
code on github
Install NVM (Node Virtual environment/Version Manager) [suggested] #
WARN: uninstall individually installed node versions before installing nvm (node version manager).
nix #
wget -O nvm-install-and-update.sh https://raw.githubusercontent.com/nvm-sh/nvm/v0.39.3/install.sh && bash nvm-install-and-update.sh
re-open terminal / re-login.
win #
coreybutler/nvm-windows > releases
- OSX, *nix:
- Windows:
- nvm-windows
- nodist: github.com/marcelklehr/nodist
Install & Initialize The 1st Project (Win + Expo) #
install node.js (including npm) #
Ref: 下载 | Node.js (nodejs.org) https://nodejs.org/zh-cn/download/
install expo cli #
npm install --global expo-cli
init a project #
# in windows CLI or linux bash
expo init <restaurants-search>
# and select the default blank-mini demo project
cd <restaurants-search>
npm run start
# which runs: package.json > "scripts":> "start": "expo start".
# will show an URL and a QR code
Scan the QR code or type-in the URL in the Android/iOS “Expo Go” App (called “Expo” when searching app-store).
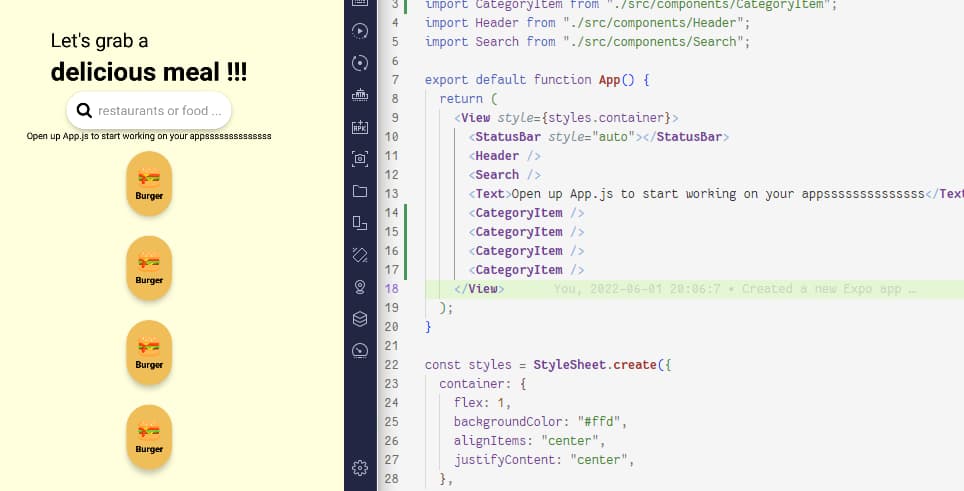
Go to “App.js” and understand how it works.
Install Node on MacOS #
(Code w/ specific versions as an example to reproduce projects.)
Download & Install Node from official site. (but nvm is preffered)
Components #
Create folder src/components.
Create the component file ‘Header.js’ under “src/components”.
A component is (always?) a function in code.
import { Text, View, StyleSheet } from "react-native";

export default function Header() {
  return (
    <View style={styles.container}>
      <Text style={styles.lightHeader}>Let's grab a </Text>
      <Text style={styles.boldHeader}>delicious meal !!!</Text>
    </View>
  );
}

const styles = StyleSheet.create({
  container: {
    marginTop: 60,
    marginHorizontal: 25,
  },
  lightHeader: {
    fontSize: 30,
  },
  boldHeader: {
    fontSize: 40,
    fontWeight: "bold",
  },
});

Advice from the React Team: use components as functions better than classes.
interactive components (e.g. input) #
Create the component file ‘Search.js’:
(tip: vector-icons is used)
import { View, TextInput, StyleSheet } from "react-native";
import { FontAwesome } from "@expo/vector-icons";

export default function Search() {
  return (
    <View style={styles.container}>
      <FontAwesome name="search" size={25} />
      <TextInput style={styles.input} placeholder="restaurants or food ..." />
    </View>
  );
}

const styles = StyleSheet.create({
  container: {
    flexDirection: "row",
    marginTop: 5,
    marginHorizontal: 25,
    backgroundColor: "white",
    shadowColor: "black",
    shadowOffset: { width: 15, height: 5 }, //  x+5(to right), y+5(to down)
    elevation: 6,
    shadowOpacity: 0.5,
    padding: 15,
    borderRadius: 40,
  },
  input: {
    fontSize: 20,
    marginLeft: 10,
  },
});

reuse common style #
Move the following from Search.js:
    shadowColor: "black",
    shadowOffset: { width: 15, height: 5 }, //  x+5(to right), y+5(to down)
    elevation: 6,
    shadowOpacity: 0.5,
to a new file “src/common/styles.js” and export:
export const elevation = {
  shadowColor: "black",
  shadowOffset: { width: 15, height: 5 }, //  x+5(to right), y+5(to down)
  elevation: 6,
  shadowOpacity: 0.5,
};
and import into “Search.js” and use in style (array!):
import { elevation } from "../common/styles";
...
<View style={[styles.container, styles.elevation]}>
...
const styles = StyleSheet.create({
  ...
  elevation,
  ...
})
reuse components with props (passing properties, variables) #
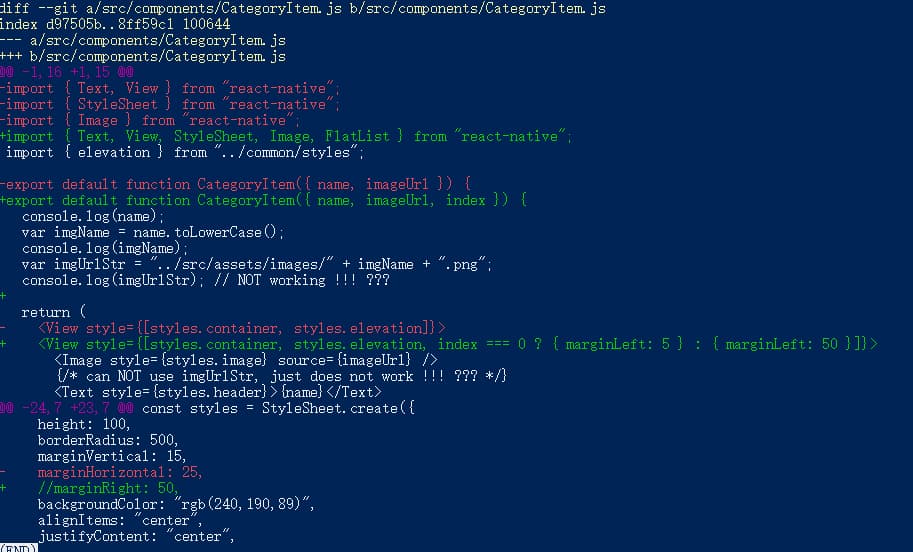
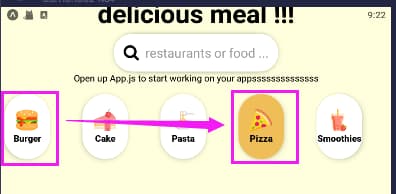
download images from github and put into “./src/assets/images”.
before using props (before video t=3934, only hard-coded values, commit f8c00c8):
using custom props:
solution 1: use (props).
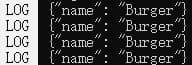
export default function CategoryItem(props) {
  console.log(props);
  return (
    <View style={[styles.container, styles.elevation]}>
      <Image style={styles.image} source={require("../assets/images/burger.png")} />
      <Text style={styles.header}>{props.name}</Text>
    </View>
  );
}
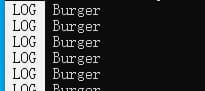
solution 2: use the property’s name directly (here is the food “name”).
WARN: watch the {} !
export default function CategoryItem({ name }) {
  console.log(name);
  return (
    <View style={[styles.container, styles.elevation]}>
      <Image style={styles.image} source={require("../assets/images/burger.png")} />
      <Text style={styles.header}>{name}</Text>
    </View>
  );
}
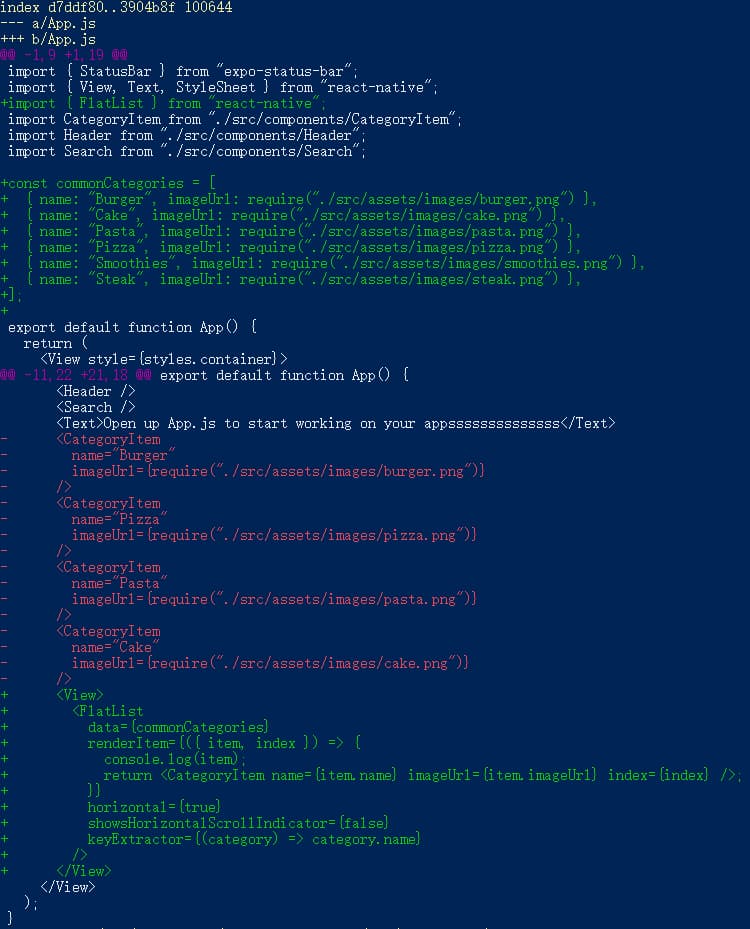
FlatList (Like ListView in MVC/Django) #
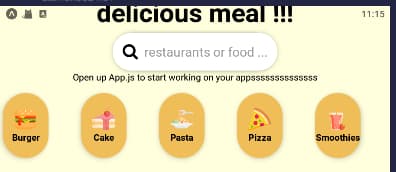
const commonCategories = [
  { name: "Burger", imageUrl: require("./src/assets/images/burger.png") },
  { name: "Cake", imageUrl: require("./src/assets/images/cake.png") },
  { name: "Pasta", imageUrl: require("./src/assets/images/pasta.png") },
  { name: "Pizza", imageUrl: require("./src/assets/images/pizza.png") },
  { name: "Smoothies", imageUrl: require("./src/assets/images/smoothies.png") },
  { name: "Steak", imageUrl: require("./src/assets/images/steak.png") },
];

export default function App() {
  return (
    ...
        <FlatList
          data={commonCategories}
          renderItem={({ item }) => {
            console.log(item);
            return <CategoryItem name={item.name} imageUrl={item.imageUrl} />;
          }}
          horizontal={true}
          showsHorizontalScrollIndicator={false}
          keyExtractor={(category) => category.name} // see use key in flatlist
        />
    ...
)
use key in flatlist (id in js-dom) #
i.e. use keyExtractor prop in FlatList component (see above), to get a high-performance long list.
use index in flatlist #
… for index (of array) -based conditional action/style.
Tip: index starts from 0.
// App.js
...
<FlatList
  data={commonCategories}
  renderItem={({ item, index }) => {
    console.log(item);
    return <CategoryItem name={item.name} imageUrl={item.imageUrl} index={index} />;
  }}
  horizontal={true}
  showsHorizontalScrollIndicator={false}
  keyExtractor={(category) => category.name}
/>
...
// CategoryItem.js
...
export default function CategoryItem({ name, imageUrl, index }) {
  return (
    <View style={[styles.container, styles.elevation, index === 0 ? { marginLeft: 5 } : { marginLeft: 50 }]}>
      <Image style={styles.image} source={imageUrl} />
      {/* can NOT use imgUrlStr, just does not work !!! ??? */}
      <Text style={styles.header}>{name}</Text>
    </View>
  );
}
...
State (Status) & Component Re-rendering #
Changing a varialbe will not lead to a re-rendering.
We need useState hook to re-render the components when changing a variable.
App.js:
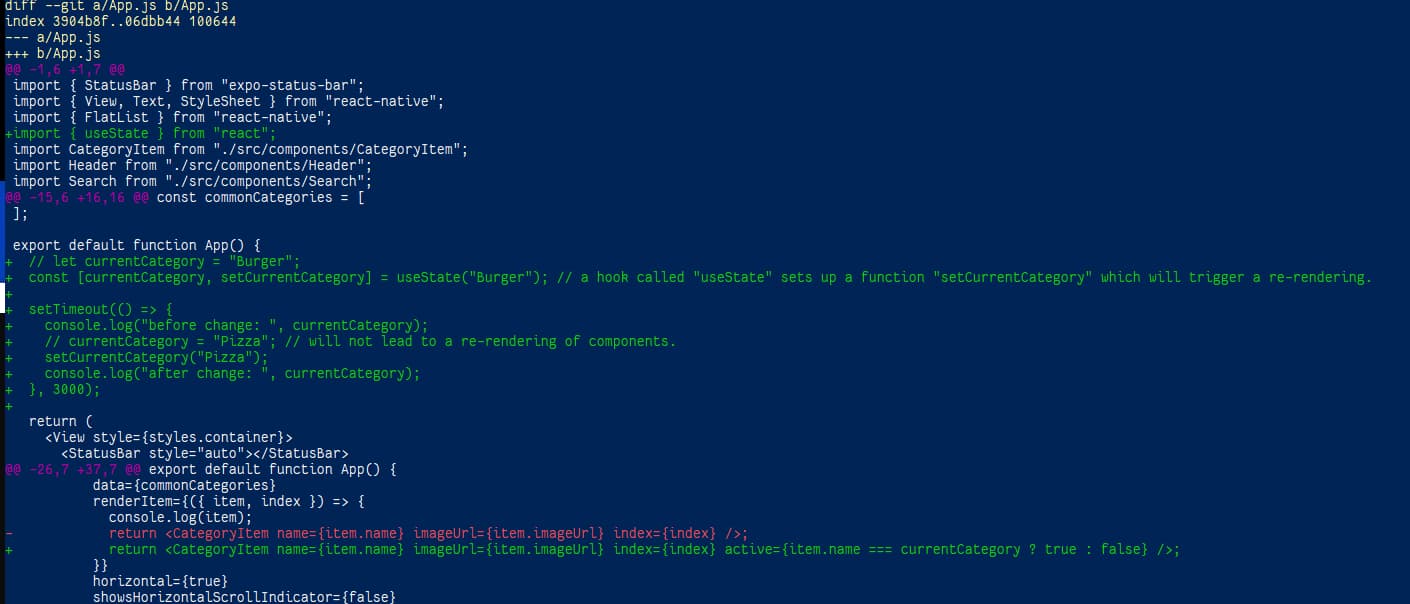
CategoryItem.js:
Effect:
At t=5900 (commit 0b6993f), changing variable can trigger re-rendering.
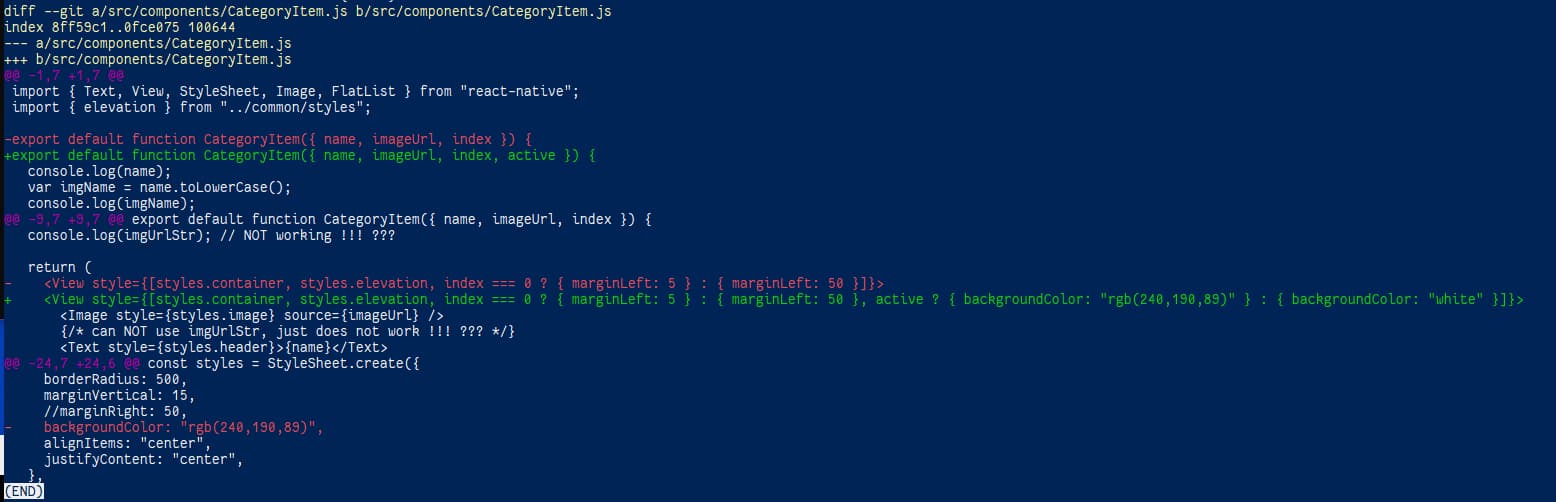
Handling Events #
Event: something a user did, e.g. scroll, tab, hold, press …
button alternative – TouchableOpacity componenet instead of Button
#
(e.g. use a category-item like a “button”)
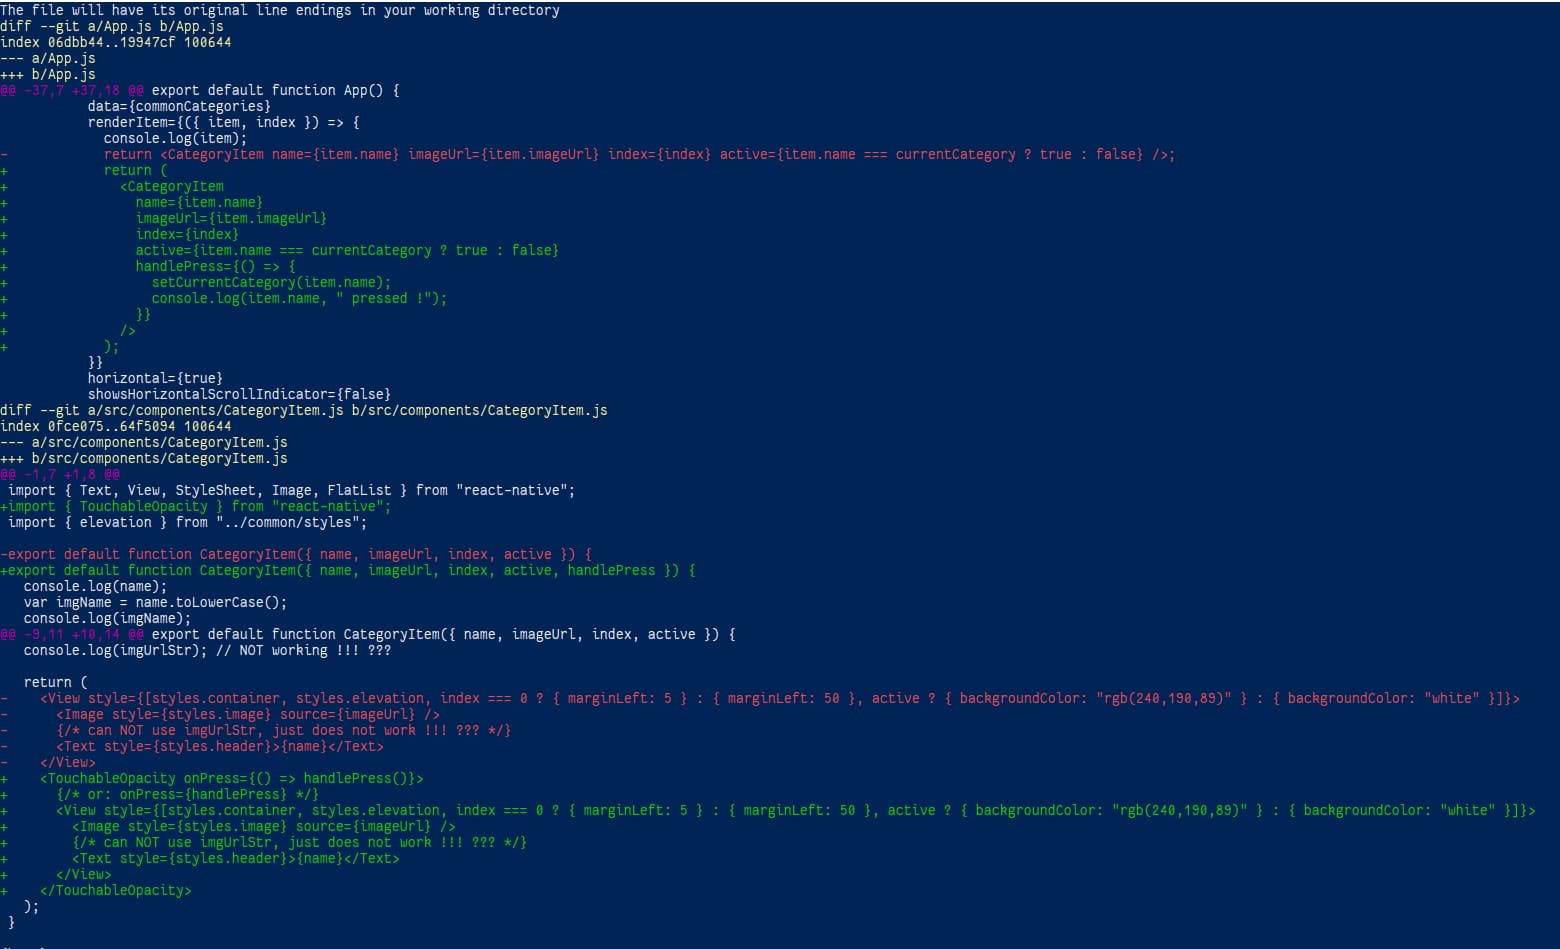
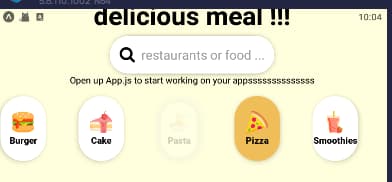
At t=6205s (commit 9c2ef29), the category items are clickable/pressable.
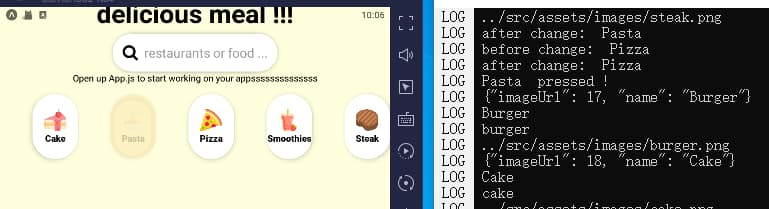
more events & state #
(e.g. using the search bar input)
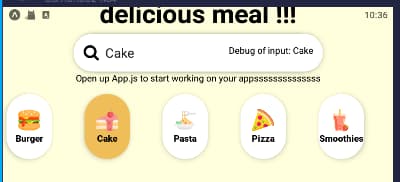
Type a category, like “Cake”, and “Enter” (onEndEditing event):
Effect:
Code:
At t=6597 (f885f6e), we can take search input and change active category item accordingly.
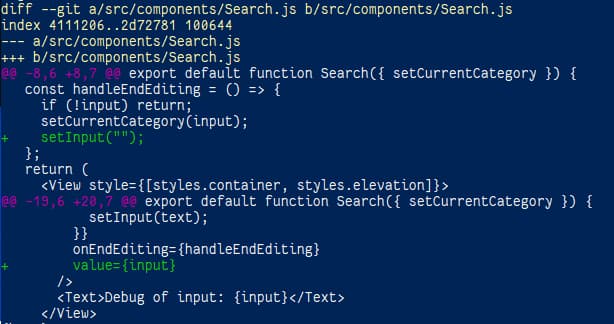
two-way / 2-way binding #
(e.g. clear the search bar when “endEditing”)
In the TextInput component: value={input}.
In the handleEndEditing function: setInput("").
Code:
Effect:
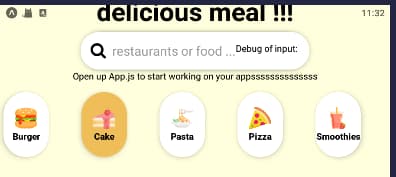
At t=6699 (79c57d0), search bar input is cleared when “Enter” (onEndEditing).
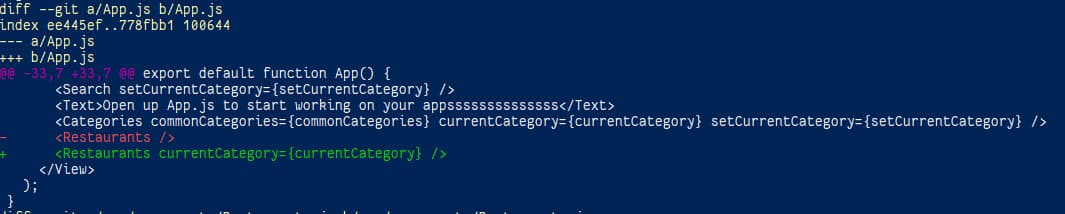
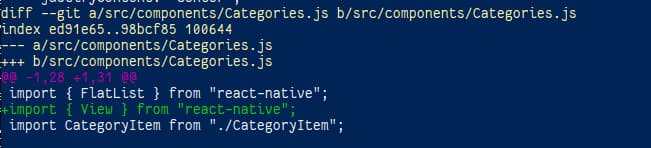
Parent Component #
Set up a parent componenet if it is too big.
App.js before:
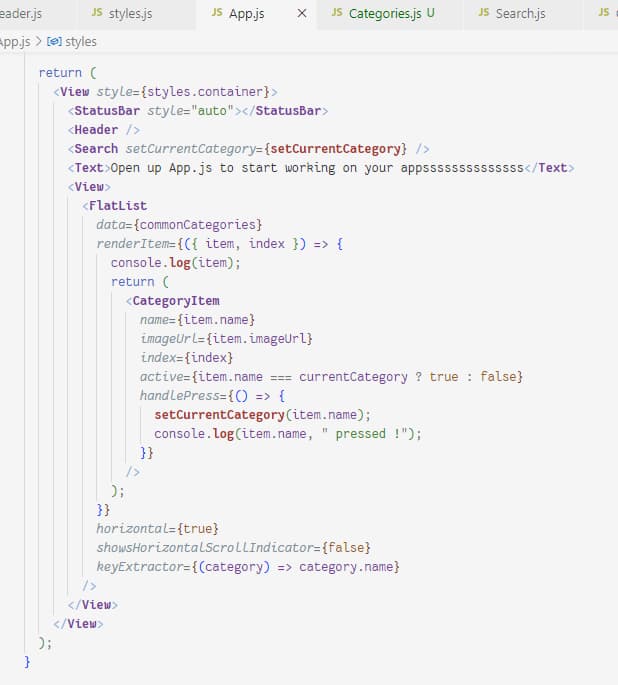
App.js after:
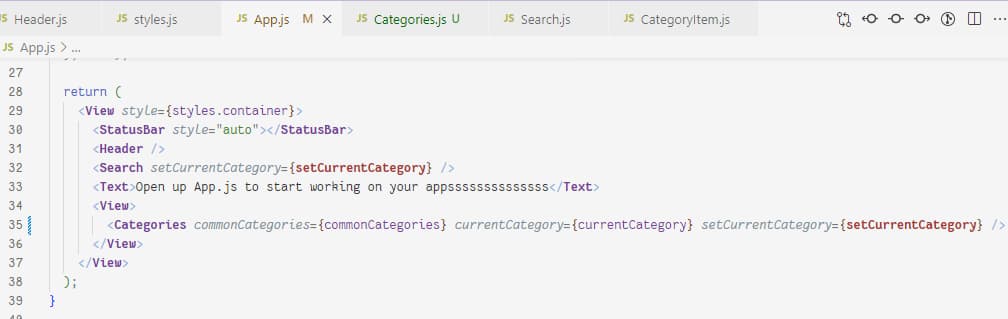
Diff:

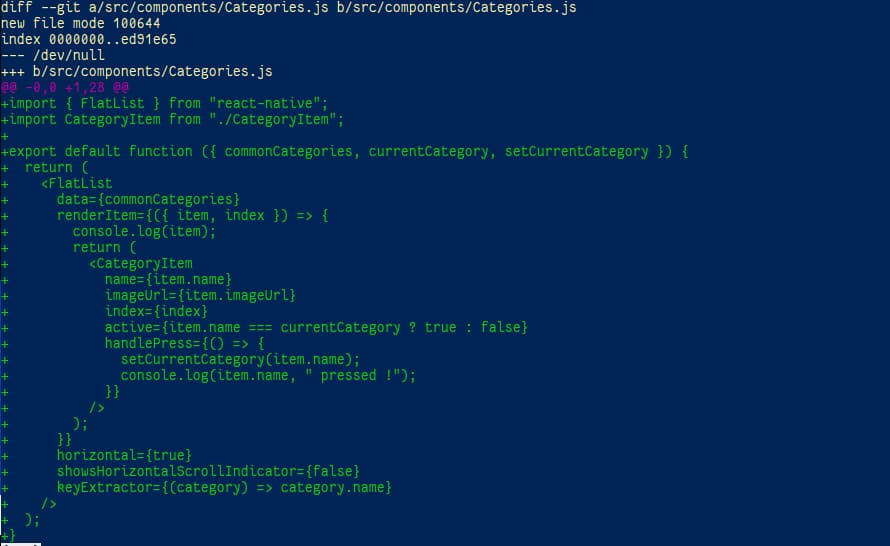
At 6=6945 (2c35b40), we extract the “categories” into a new file / a new component so the App.js is clean.
HTTP Requests #
npm install axios
npm install will add axios to package.json automatically (NOTE: no -g !).
ref: fusion.yelp.com > Manage App.
src/api/yelp.js & Restaurants.js:
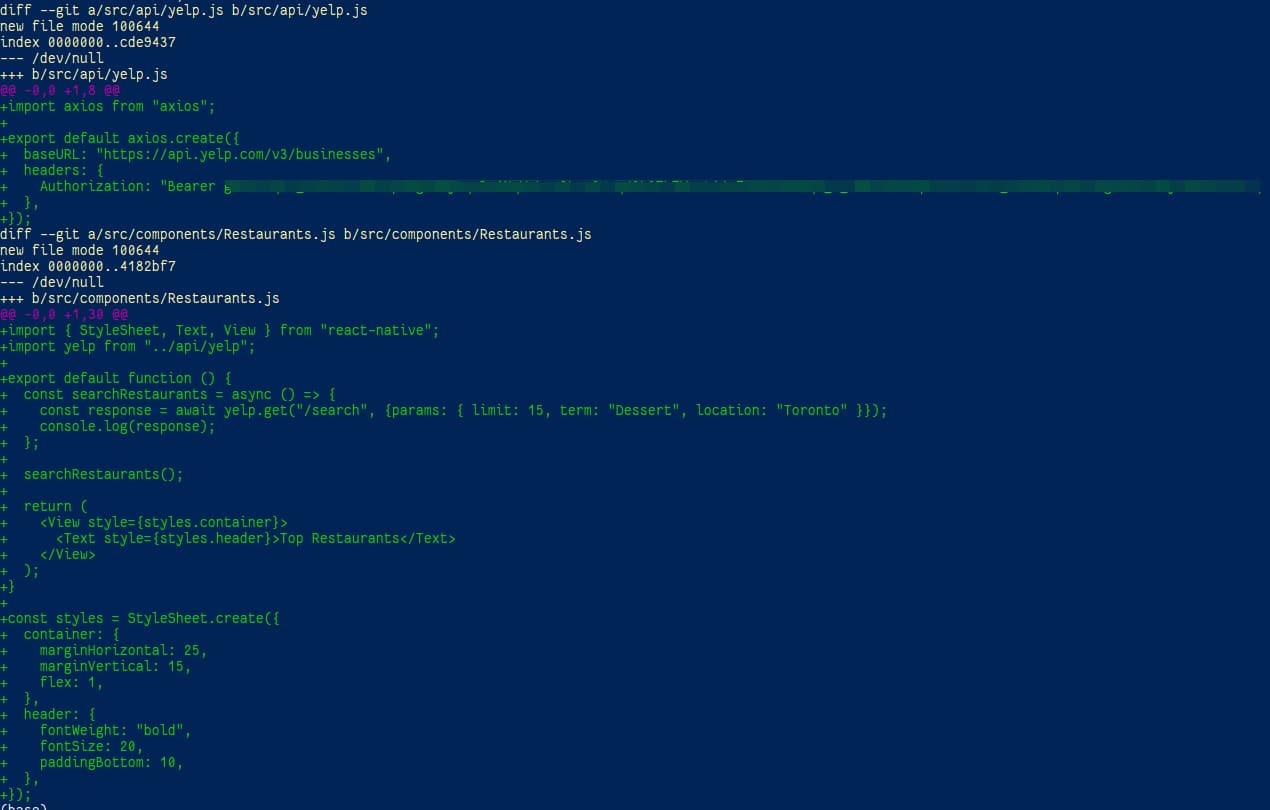
At t=8199 (e3e6de5), finished basic HTTP get with fusion.yelp.com & axios pkg.
Custom Hooks #
New file src/hooks/useRestaurants.js:
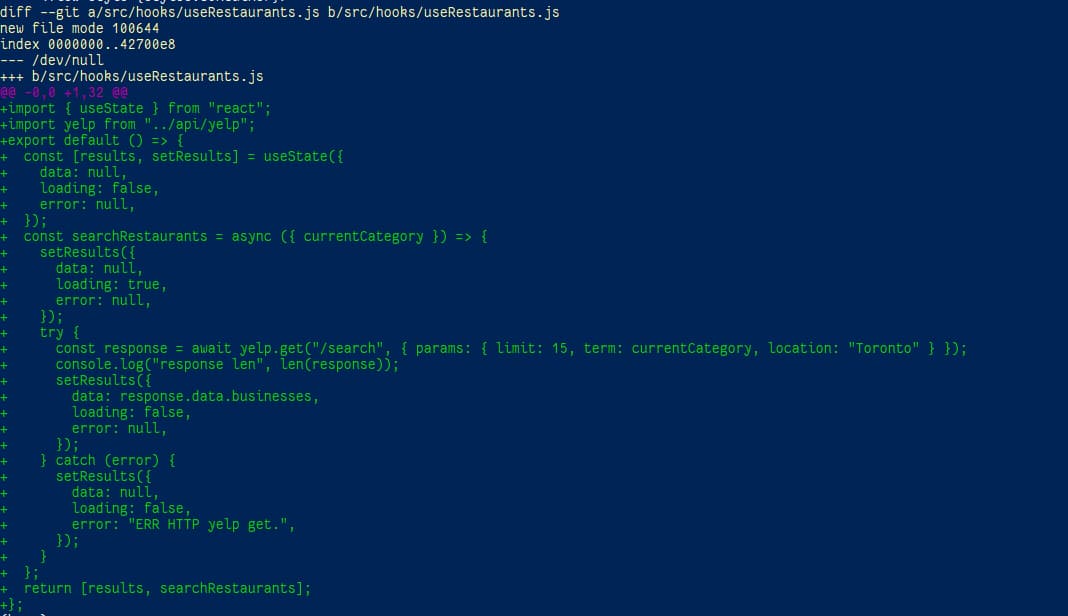
import { useState } from "react";
import yelp from "../api/yelp";
export default () => {
  const [results, setResults] = useState({
    data: null,
    loading: false,
    error: null,
  });
  const searchRestaurants = async ({ currentCategory }) => {
    setResults({
      data: null,
      loading: true,
      error: null,
    });
    try {
      const response = await yelp.get("/search", { params: { limit: 15, term: currentCategory, location: "Toronto" } });
      console.log("response len", len(response));
      setResults({
        data: response.data.businesses,
        loading: false,
        error: null,
      });
    } catch (error) {
      setResults({
        data: null,
        loading: false,
        error: "ERR HTTP yelp get.",
      });
    }
  };
  return [results, searchRestaurants];
};
Restaurants.js:
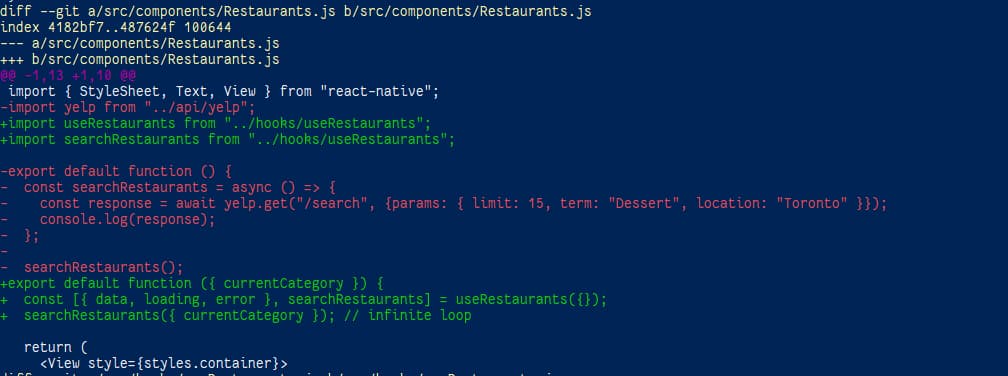
App.js:
Problem: infinite loop.
Reason: a component will re-render if its state(s) change.
Solution: Effect.
Effect #
useEffect() (from "react") takes 2 parameters: a callback function (the func that should run only once on App loading & dependency change) & a dependencyList (array).
At t=10146, useEffect to run a func only once; handle/parse HTTP response and display a restaurant’s FlatList in View.
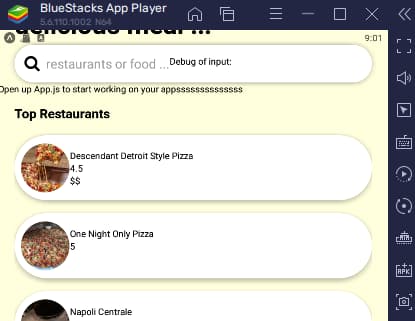
Add a list of restaurants:
code:

effect:
Problem: Categories FlatList is “overflow” on the screen.
Reason: Restaurants View-FlatList is overwriting Categories FlatList.
Solution: Make Categories FlatList also inside a View.
code:
Overall Effect:

At t=10439s (45485a6), we finished the homepage.
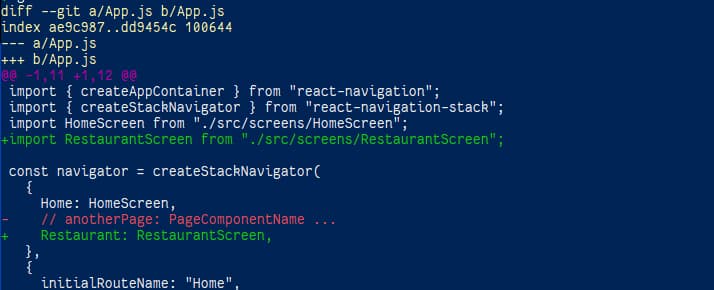
Screens (“Multi-Page” Navigation) #
npm install reacct-navigation react-navigation-stack
Move all content of App.js to src/screens/HomeScreen.js and change file pathes in the import part.
Create a navigator and put into default appContainer in App.js:
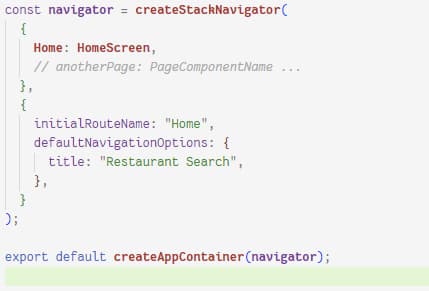
At t=11011 (commit 7077018), a HomeScreen is created. (The App is working as it was.)
Screen Navigation (Routing) #
With withNavigation + TouchableOpacity.
1st, add a screen:
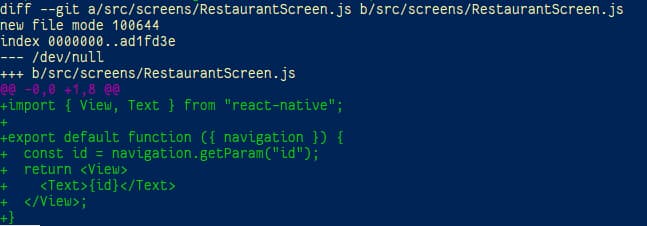
2nd, add the screen to the screen list in App.js:
3rd, add a navigation (add a hyperlink to the source):
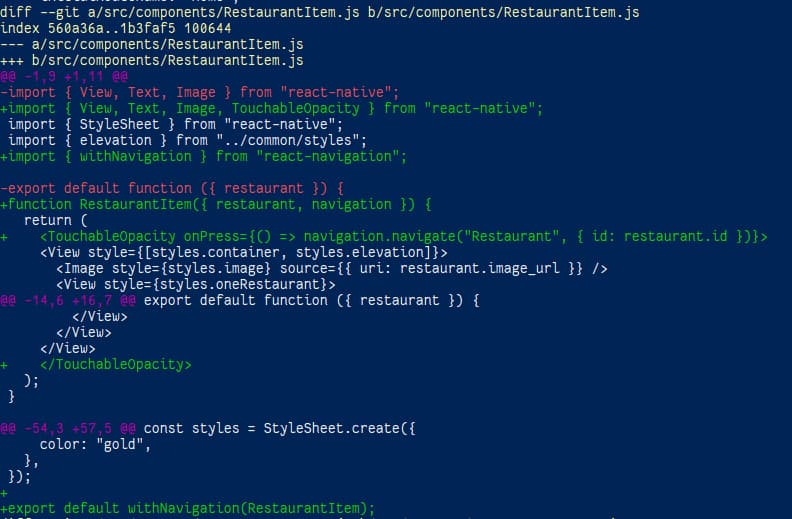
Note: for components used in App.js, there is no need to import {withNavigation}.
At t=11657 (281f0bc), add the 2nd screen: RestaurantScreen for 1 rest. details.; added screen navigation with param.
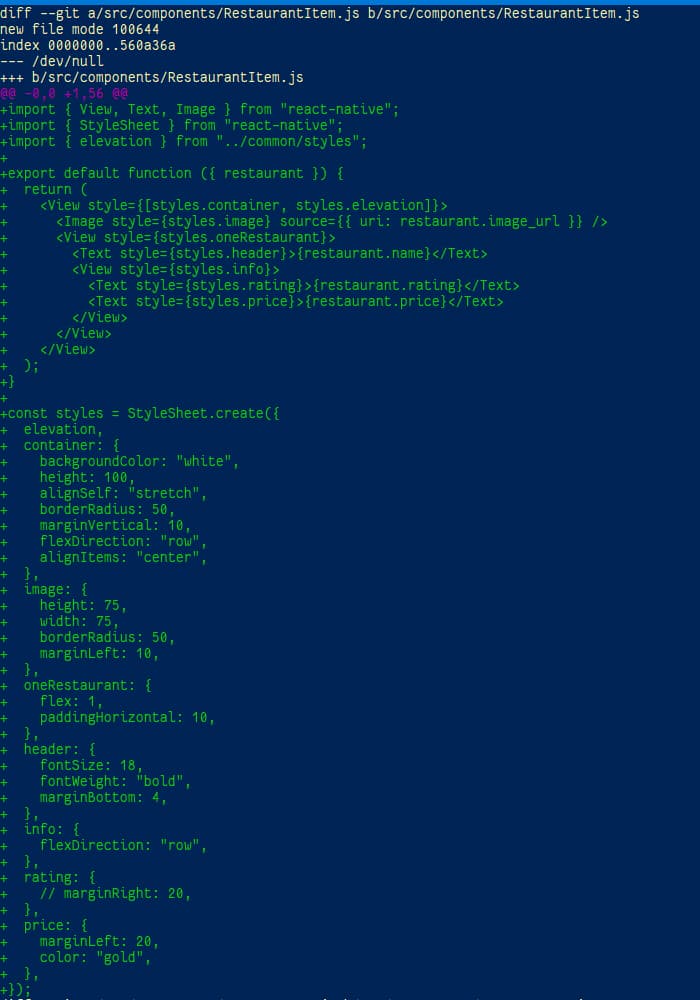
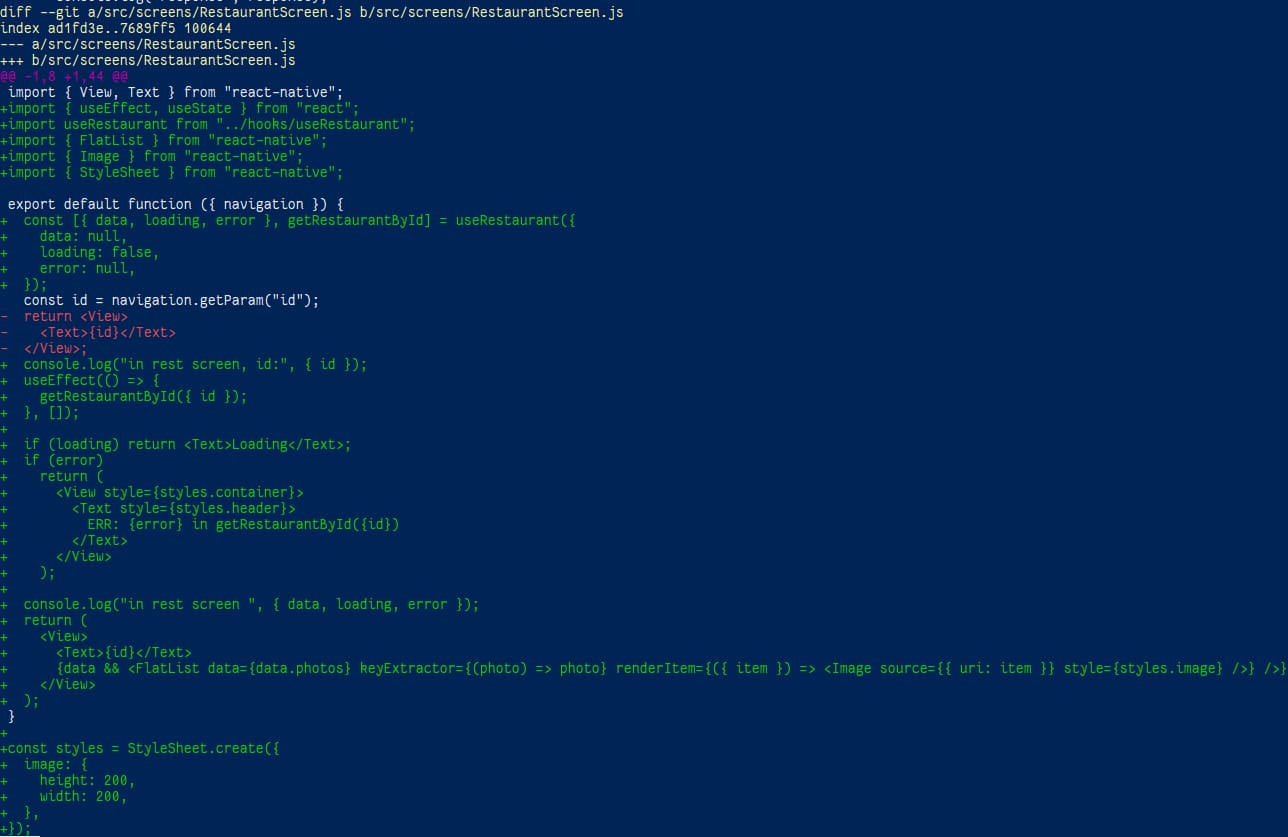
Add Photo #
In the screen js:
qqq
Related hook:
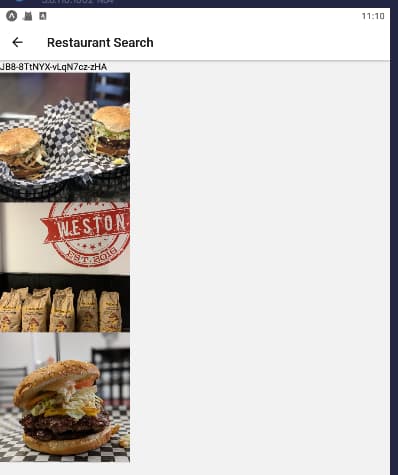
At t=12163, can show photos with fixed size.
Dynamic Size w.r.t. Screen Size #
Code:
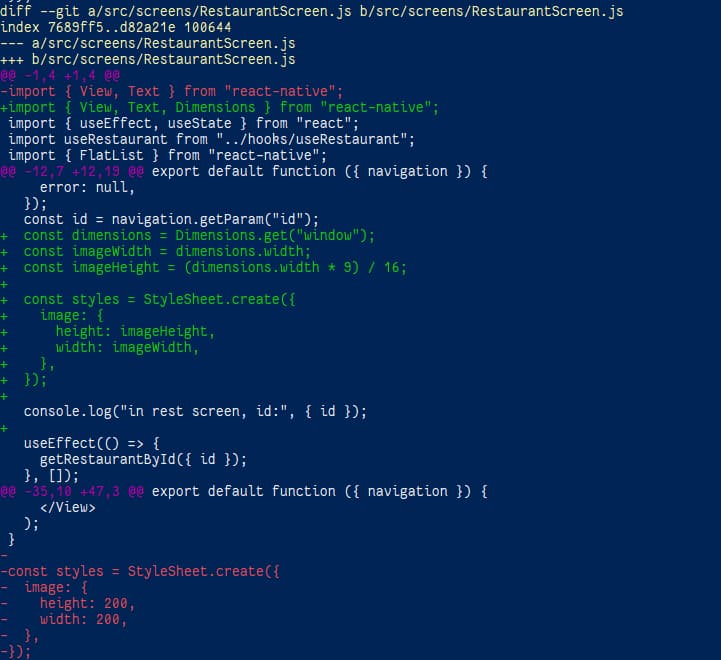
Effect:

All done (123552b)! 17 hours (34 tomatoes) is used for a 3.5h video.
Build Android #
Requirements:
- Install Android Studio
- Config CMake, NDK, Android SDK >= 31 …
- Android SDK env
- Java (jdk?)
frequently used cmd:
cd <proj_root>
cd android

# apk:
./gradlew assembleDebug
./gradlew assembleRelease
./gradlew installDebug
./gradlew installRelease
./gradlew bundleDebug

./gradlew bundleRelease

./gradlew :base:bundleDebug

./gradlew --stop && ./gradlew clean
Build & Release for iOS #
build #
- Use the latest MacOS and install the latest xcode.
- Open the workspace “<RN_app_root>/ios/<some_name>.xcworkspace” (NOT the .xcodeproj !).
- Click the project name and choose “Pods”, “Signing & Capabilities > All > Signing”, check “Automatically manage signing”. (Make sure having the admin rights so xcode can config app id, certificates etc. automatically. !!!)
some cmd which might be useful if Podfile exists. ref
sudo gem install --verbose cocoapods
# or
brew install --verbose cocoapods

cd <RN_app_root>/ios/

pod install --verbose
# or
pod install --verbose --no-repo-update # faster https://blog.csdn.net/Boyqicheng/article/details/73930278
(this can be used to solve the “Redefinition of ‘MethodDescriptor’” problem)
release #
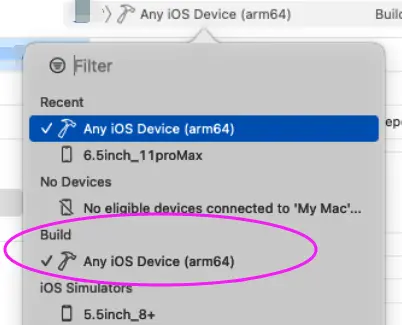
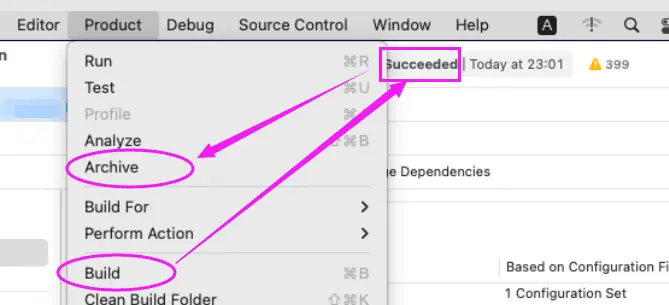
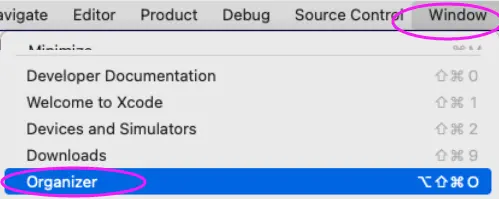 (if the list of archives is not shown)

If automatic managing is ued, then now the archive is available on appleconnect to be added to a release.
Passowrd Hashing Using bcrypt #
install the bcrypt package #
npm install bcrypt
node
meanings of 4 parts of bifurcation #
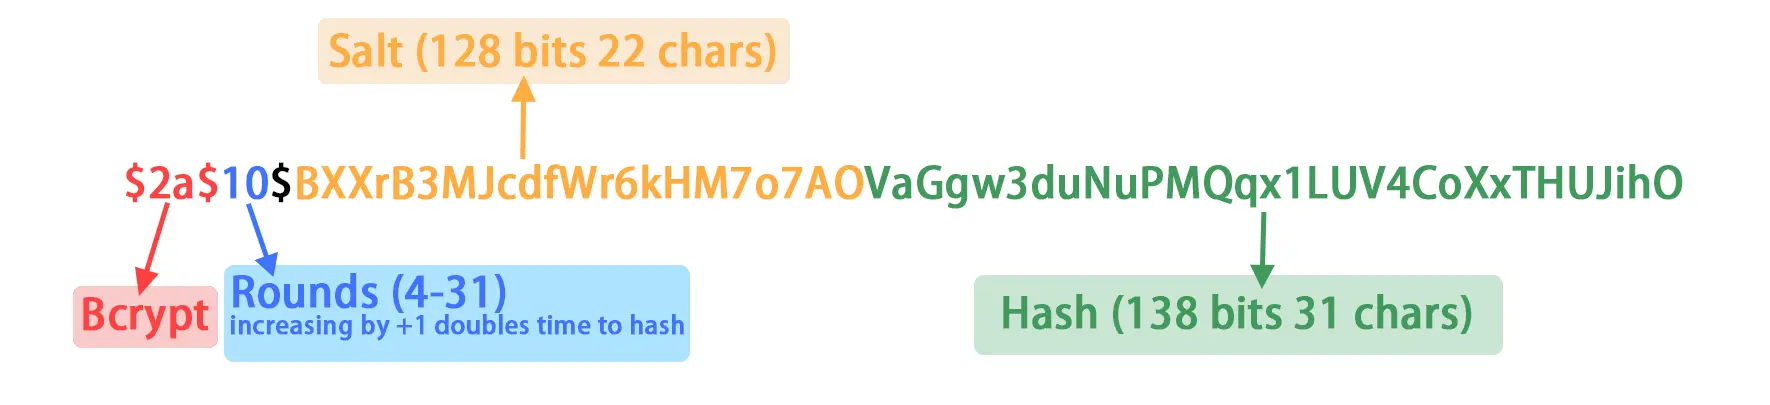
The bifurcation of hash is like this:
- BCrypt Algorithm: Will be “$2a$” or “$2b$” which means BCrypt.
- Rounds Cost: Represents the exponent used to determine how many iterations 2^n, default 2^10 (~10 hashes/sec on a 2GHz core processor).
- Salt: shown as base64 encoded, 16 bytes = 128 bits = (base64) 22 characters.
- Hash: shown as base64 encoded, 24 bytes = 192 bits = (base64) 31 characters.
create a password given the plain pwd and nr.rounds #
const bcrypt = require("bcrypt");
bcrypt.hash("123456", 10);
create a password given the plain pwd and salt #
const bcrypt = require("bcrypt");
bcrypt.hashSync("123456", "$2b$10$wcLZeUvgpf6vj4sw5eQ3nO");
// bcrypt.hash('123456', '$2b$10$wcLZeUvgpf6vj4sw5eQ3nO').then(hash => {console.log('Hash: ', hash)})
// let hashedPassword = bcrypt.hash('123456', '$2b$10$wcLZeUvgpf6vj4sw5eQ3nO')
////  $2b$10$wcLZeUvgpf6vj4sw5eQ3nOd5Y13Rj8pZ7KNgy9c1DVMCuRapFdhMa
compare / check a password #
const bcrypt = require("bcrypt");
bcrypt.compareSync("123456", "$2b$10$wcLZeUvgpf6vj4sw5eQ3nOd5Y13Rj8pZ7KNgy9c1DVMCuRapFdhMa");
// bcrypt.compare('123456', '$2b$10$wcLZeUvgpf6vj4sw5eQ3nOd5Y13Rj8pZ7KNgy9c1DVMCuRapFdhMa').then(function(result) {console.log('Result: ', result)});
// let result = bcrypt.compare('123456', '$2b$10$wcLZeUvgpf6vj4sw5eQ3nOd5Y13Rj8pZ7KNgy9c1DVMCuRapFdhMa')
FAQ #
See also:
Problem: CanNOT find package after installation.
Reason & Solution: must restart npm.
Problem: Invariant Violation: requireNativeComponent: “RNGestureHandlerRootView” was not found in the UIManager.
Reason: incompatible package for Expo Go.
Solution: npm install --save react-native-gesture-handler, then a warning is shown when npm run start which should be followed.
More:
蒋宏伟 React Native 新架构实战课 05 | Image:选择适合你的图片加载方式 极客时间.html
关于面试:
记一次 react native 面试
ReactNative 进阶(四十二):面试必备:2022 ReactNative 经典面试题总结(含答案)
Problem: ERR downloading <package.tgz>.
Solution: npm install --unsafe-perm <package>. ref: stackoverflow
Problem:UnicodeDecodeError: ‘utf-8’ codec can’t decode byte 0x… in position …
Reason: windows codepage defaults to local (e.g. gbk), but compilation requires utf-8. (ref: csdn).
Solution: temp: chcp 65001. long-term:
Windows Registry Editor Version 5.00

[HKEY_LOCAL_MACHINE\SOFTWARE\Microsoft\Command Processor]
"autorun"="chcp 65001"
Problem: npm install source too slow.
Solution: mirror of taobao. WARN: do NOT use “cnmp” (deprecated).
# temporary
npm install express --registry https://registry.npm.taobao.org

# permanent
npm config set registry https://registry.npm.taobao.org

# verify
npm info express
# or
npm config get registry

# restore
npm config set registry https://registry.npmjs.org
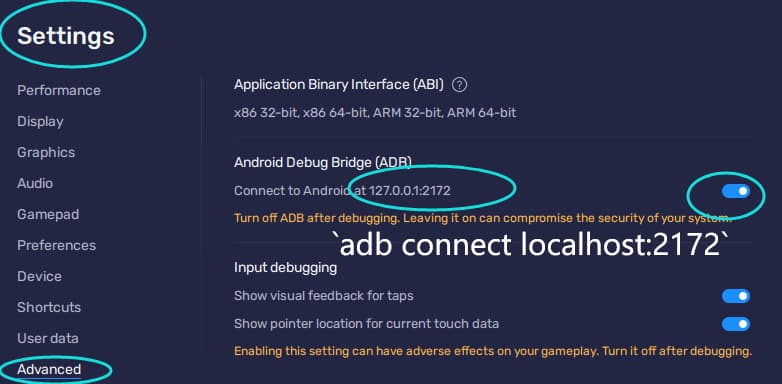
Problem: adb does not show bluestack 5.
Solution:
adb connect localhost:2172
adb devices
npm run android
Problem: third party package error, “errno -4058”
Solution: npm rebuild <pkg_name>. You may also need npm cache clean --force && npm install. (ref)
Problem [Not solved]: React-Native assembleRelease fails for task ‘:app:bundleReleaseJsAndAssets’.
Reason: happens when run ./gradlew assembleRelease before making a js bundle.
Solution:
react-native bundle --platform android --dev false --entry-file index.js --bundle-output android/app/src/main/assets/index.android.bundle --assets-dest android/app/src/main/res
cd android
./gradlew --stop
./gradlew clean
./gradlew assembleRelease # or: ./gradlew aR
May try: ./gradlew app:assembleRelease?, ./gradlew assembleDebug?
Problem: 无法将"react-native"项识别为 cmdlet、函数、脚本文件或可运行程序的名称。
Solution: 解决:重新安装: npm install -g react-native-cli --force. (Note the -g & ...-cli).
(package react-native might be needed?)
Problem: 无法将“create-react-app"项识别为 cmdlet、函数、脚本文件或可运行程序的名称。
Solution: 解决:重新安装脚手架工具: npm install -g create-react-app. (Note the -g).
Problem: “Installed Build Tools revision 31.0.0 is corrupted”.
Reason: wrong filenames in the tools, not corrupted.
Solution:
cd C:\Users\<user>\AppData\Local\Android\Sdk\build-tools\31.0.0
mv d8.bat dx.bat
mv lib/d8.jar lib/dx.jar
Problem: “No bundle URL present” red-heading screen on mobile when [npx] react-native run-android/ios.
Reasons: 1. Metro bundle server is not running; 2. accessing http resource instead of httpS; 3. localhost not resolved in hosts. etc.
Solutions: 1. [npx] react-native start --reset-cache in one ternimal (to start metro), and do the actual [npx] react-native run-android/ios in another terminal. 2. Info.plist stackoverflow; 3. edit hosts to include localhost; 4.
Tip: if a metro bundle server is running, it shows:

Problem: “Invariant Violation: Tried to register two views with the same name RNDatetimePicker” red-heading screen.
Possible reason: DatetimePicker version in package.json conflicts with version required by other packages (e.g. native base).
Solutions (to try): Modify package.json: 1. use ^ for the version (to be flexible); 2. change version; 3. remove from the package.json (as already undirectly required by others). For each try, rm -r node-modules; rm package-lock.json; npm install.
Problem: What’s the meaning of ~ or ^ before the version in package.json?
Solution: Take version 1.2.3 as an example, ~1.2.3 means can install 1.2.y, ^ means can install 1.x.y which is more flexible. The default prefix can be changed by npm config set save-prefix='' (ref)
Problem: “Unrecognized font family ‘iconfont’ " red-heading screen.
Reasons & Solution: 1. config xcode to have the fonts for all targets (see pics below) or edit corresponding “Info.plist” directly; 2. for RN >=0.60, need to set “pod ‘RNVectorIcons’, :path => ‘../node_modules/react-native-vector-icons’”; 3. for RN <0.60, need to link. (2&3 are commonly seen in StackOverflow etc.)
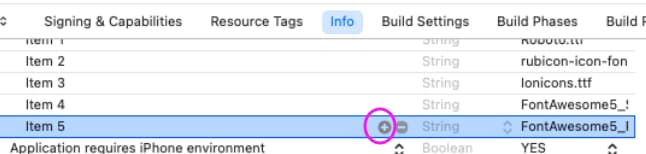
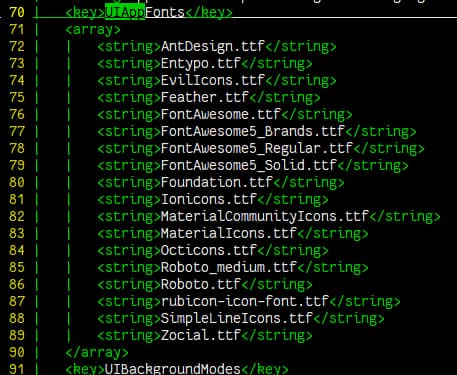
For chars in font names, it may show dash - but use underscore _ in “xcode》info” or “./ios/<proj/target_name>/Info.plist”. ref
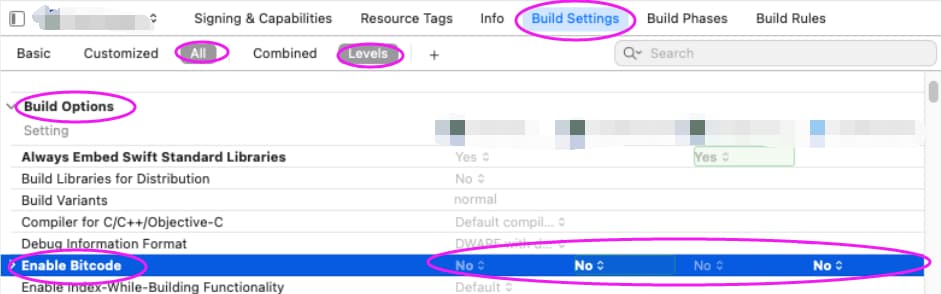
Problem: “could not reparse object file in bitcode bundle ‘invalid bitcode version for architecture arm64 … "
Reason: reader version is older than producer, xcode is old and should be updated (but may lack updates in current MacOS).
Solution:
In XCode 》 related_project 》 Build Settings (with all & levels view), set “Enable Bitcode” to “No”.
e0f9b2)
Problem: “could not reparse object file in bitcode bundle ‘invalid bitcode version for architecture arm64 … "
Reason: reader version is older than producer, xcode is old and should be updated (but may lack updates in current MacOS).
Solution:
In XCode 》 related_project 》 Build Settings (with all & levels view), set “Enable Bitcode” to “No”.
Problem: needs a simple http server.
Solution:
# faster than py as it uses asynchronous IO for concurrent handling of requests
## run without installing
npx http-server [path] [-p 8080] [-a 0.0.0.0] [other options]

# or:
## install globally
npm install http-server -g && http-server [path] [-p 8080] [-a 0.0.0.0] [other options]

# or (python build-in):
python3 -m http.server [8000] [--directory ./] [--bind 127.0.0.1]

# or: (py2 only) uses 404.html as the default 404 page.
pip install SimpleHTTPServer SimpleHTTP404Server && python -m SimpleHTTP404Server [8000]
Problem: [nix] needs port number 80 (port number below / lower than 1024) without root/sudo.
Solution:
sudo apt-get install libcap2-bin
sudo setcap 'cap_net_bind_service=+ep' /path/to/program
Problem: Error with gradlew: /usr/bin/env: bash\r: No such file or directory.
Reason: Windows style EOL (CRLF) in Linux.
Solution: For 1 file: vim :set fileformat=unix.
For many files: sudo apt-get install dos2unix; sudo find . -type f -exec dos2unix {} \;
To prevent in the future: git config core.autocrlf input (input is suggested, it means Git converts files to Unix format when using Git in Windows, but do nothing when check-out to Windows; auto means Git converts between Win & Nix format in Windows.)